click here for high quality gif-image (345 kB)
Gerd Kaupp, Andreas Herrmann and Michael Haak
Organic Chemistry I, University of Oldenburg, Germany
E-mail: kaupp@kaupp.chemie.uni-oldenburg.de
INTRODUCTION
Supermicroscopic techniques like scanning tunneling microscopy (STM), atomic force microscopy (AFM)1 or scanning near-field optical microscopy (SNOM)2,3 have matured for investigation of rough surfaces with practical applications.1-3 Atomic resolution remains restricted to very flat surfaces and STM or AFM.3,4 Aperture-SNOM has severe problems with topographies,5 but these are not present in apertureless SNOM. Actually, eight principally different SNOM techniques exist and various operation modes are distinguished (e.g. contact or non-contact, constant distance or constant height, reflection or transmission modes, etc.).2 But still, authors have been cautious with the interpretation of highly resolved SNOM images in apertureless contact transmission mode, i.e. with far-field light collection.6
Metal-coated tips in small-aperture-SNOM (<100 nm) become very hot (>100°C)7 and are very blunt. Thus, the aperture cannot be operated at constant shear-force distance on rough or sensitive surfaces. The only choice would be constant height mode, but that gives rise to interference and other topography related errors. Furthermore, shadowing effects are hard to treat. Only cold and sharp tips can follow topographies of rough surfaces in constant distance and collect optical information independent of topography.2,3 This technique relies on the change of reflectance back to the fiber as the tip approaches the surface.8 Such changes were denied 9 but we were able to unequivocally show a sudden increase in reflectance and the absence of interference fringes with very sharp uncoated tips.10 We also showed the absence of the sudden increase (or even a sudden decrease) when broken or abrased tips were used.10 Clearly, in the latter cases only artifacts can be recorded. Furthermore, depolarization SNOM with an uncoated tip at 30 nm "constant height" over a grooved metal surface (50 nm thick) on glass gave edge-contrast but not materials' contrast.11 That experiment did not profit from a sudden increase in reflectivity, though.
It appears important to document the various types of artifacts in topography and SNOM that occur with deficient tips in order to clarify the issue. Artificial images in other modes of SNOM are then also easily recognized and valid submicroscopic SNOM images distinguished from artifacts. Thorough analyses of published data are not possible with pixel graphics in paper or electronic publications. Validity check of such data is not possible. We therefore present full 3D data of all AFM and SNOM images also in VRML format (the z-scales are rounded to 10 nanometers; the Volt readings are relative values). These data can be interactively analyzed with public domain software, e.g. Cosmoplayer, or proprietary imaging software. We converted the data to low resolution for a more rapid viewing. However, full information is available from the high resolution data that are also included. More rapid facilities in the future will be prospectively served in view of efficient data mining. Furthermore, interactive data are subject to later improvements of display and analytical investigation, as tools become available.
ARTIFACTS IN AFM TOPOGRAPHIES ON ROUGH SURFACES
AFM provides the most popular feedback mechanism for SNOM in constant distance mode. As a rule SNOM images cannot be analyzed if a surface cannot be properly measured by AFM. We therefore have to briefly address the recognition of AFM artifacts in this review. It is obvious that both contact and non-contact AFM cannot trace caves, overhangs, verticals and slopes that are steeper than their slope angles (90°- apex angle) on a surface. All artifacts that derive from unsuitable geometric effects have been termed tip/sample convolution and various correction formula were reported in particular for atomic or molecular resolution, however, no general technique is available for corrections of tip/sample convolution at irregular or very high topographies.1,12
The quantification of topographic structure with several mathematical approaches was recently analyzed.13
Noncontact AFM tips are particularly sharp and slender. They are vibrated for the so-called "shear-force" mode and are well-suited for particularly rough surfaces.3 However, such tips are very stiff and may break, providing another risk of artifacts. Such breakage may leave sharp edges, maintaining fairly good AFM resolution, but also smooth and wide apexes. In the latter instance smaller objects will image the tip and no topography of the surface is obtained. Thus, nanoparticles of 100-200 nm width and ca. 65 nm height may give rise to artificial "objects" as large as 1 or 2 µm in width and 80 nm in height.14
There are straightforward means to detect tip breakages. Tips can be judged by microscopic inspection, light diffraction and the absence of near-field enhancement of reflectance (see below). Reliability tests of AFM topographies are only possible when full 3D data are made available. We therefore point to some typical artificial AFM data of extreme geometries in the appendix of this review that can be interactively viewed and analyzed.
Artifacts by surface modification in AFM: The previous problem of erratic surface scraping/ablating4 has been settled by selecting cantilevers that have the tip precisely on their axis.1,15 As accumulated dust does also create asymmetry it is the duty of the operator to check if 5 to 10 scans do not change the surface. Conversely, asymmetric cantilever tips can be used in purposeful surface modification, e.g. scraping out square holes (submicro- or microcontainers) into organic crystal surfaces.1,15
ARTIFACTS IN SNOM ON ROUGH SURFACES
Aperture-SNOM using metal-coated tips
Metal-coated tips with apertures below 100 nm may become very hot (100 - 500°C) due to absorption of confined light7 and that fact has been used to fabricate local pits on anthracene.16 The risk of local melting or charring organic or biological objects is obvious. Furthermore coated tips must be flat at their ends for technical reasons and are additionally blunt by the metal layer of typically 100 nm thickness.17 Flat probes of that size cannot measure rough surfaces in shear-force mode: if they are soft the material will be razed off, if they are hard the metal coated tips will break, when vibrated at 5 to 10 nm distance to the surface. A 12 nm lateral resolution was claimed by fitting a theoretical model of a 20 nm aperture and invoking a Fourier transform transfer function.18 That claim was frequently cited in the literature but was never confirmed. The extreme heat problems that are to be expected with 20 nm apertures7 should certainly be considered. Two approaches were tried to get metal coated tips some tens of nm away from the surface. Thus, one either relied on "some protrusion at the large flat area" (diameter ca. 300 nm) "that might be there for the shear-force control",5 but this technique introduced crosstalk with the firmly attached remote aperture which is no longer at constant distance in the presence of topography. The second approach uses constant height mode, i.e. the aperture is fixed at a level above the highest protrusion of the surface that is scanned under it. The former technique suffers from a displacement of the topographic and the optical images that would be distorted by topographic artifacts. The latter technique is subject to interference fringes that are formed between the planar metal disk (>300 nm diameter with a central dielectric) and the surface.19 Furthermore, various shadowing effects have to be considered both in reflection (light collected through a 20-100 nm narrow slice of air with radius of ca. 150 nm) and transmission (stray centers in the far-field). Consequently, it is extremely hard to interpret the optical contrast in such experiments, and interpretations are frequently not tried.18,20 In a recent report21 Raman light could not be collected from the inner part of a scratch in Si, 2 µm wide and 1 µm deep in a 10-20 nm distance setup. It appears that the metal coated tip went so deeply into that scratch that it was hard to collect Raman light out of it at 45° to the probe axis. Actually it proved possible to collect the typical Raman signal at 519.7 cm-1 from a scratch in Si with a SNOM that collects in the near-field into a sharp uncoated fiber tip and thus avoids all shadowing effects.22
Artificial bright/dark/bright features along the scan direction instead of disc shaped fluorescence images have been obtained from stained 100 nm diameter polystyrene spheres stuck in a 25 nm high polymer film with a "relatively large" aperture (Al-coating). These were less convincingly interpreted as "torus" shapes.23 Furthermore, the half-width of the disc-shaped fluorescence as collected with 50 nm apertures of the same particles in a 10 µm film could not be improved below 210 nm.23
A detailed study of artifacts in aperture SNOM has been published.24 An elegant solution for minimizing interference effects with flat metal coated tips has been given by Kramer et al: the topography is measured in a forward scan in constant height mode; the obtained distance information is then applied for the regulation in more remote constant distance backward scans.25 However, this technique can only be applied to very minor topography in the 10 nm range. Far-field apertured tips have been fabricated26,27 that are sharp and avoid close contact of the metal coating with the surface. Their aperture sizes are rather large, but useful photolithographic properties remain.26
Apertureless SNOM with uncoated tips
The technique of reflection-back-to-the-fiber SNOM: SNOM in the reflection-back-to-the-fiber configuration was first proposed by Courjon et al.8 but they could not avoid interference fringes in the approach curves of their setup. The more sensitive commercial setup with cross polarized detection (RasterscopeTM 4000 SNOM) unites various favorable features that are not available with aperture SNOM. Approach records show the absence of interference fringes in the optical signal.10 The tips are sharp and easily and reproducibly pulled (15 nm end radius, apex angle <10°). They stay cold and produce no shadowing effects. Both transparent and opaque samples can be studied, and there is no displacement between simultaneous topographic and optical images. As the scanning is in constant shear-force distance (at constant damping of the vibration amplitude) large topographies up to the µm range do not introduce topographic errors. This fact is exceedingly important for technical applications to industrial surfaces including nanoparticle preparations.22 The light that is collected back by the illuminating tip in the near-field at enhanced efficiency10 may be spectroscopically analyzed (local fluorescence and Raman)22,28 in addition to the localization of chemical contrast that includes all specific shear-force responses as well. Constant height measurements are not useful, because the enhancement of the near-field reflectance into the fiber would be lost and the chemical contrast derives exclusively from variations in the enhancement.10 Thus, the meaning of constant height measurements for chemical SNOM contrast is questionable, because it would introduce topographic artifacts instead of avoiding them. However, interesting "edge-contrast" may emerge.11
Reliable reflection-back-to-the-fiber SNOM uses quartz glass tips that are pulled as sharp as possible not only for the high lateral resolution of 18 nm,29,30 but also because more blunt tips (e.g. etched ones with radii of >60 nm) tend to break readily upon scanning due to their high stiffness.22 By doing so they loose their ability for collecting enhanced reflectance.10 The high optical resolution power of sharp uncoated tips has also been verified with 25 nm high Al test samples that gave an edge resolution of 15 nm.31
In the absence of reflectance enhancement in the shear-force gap no SNOM images but artifacts are recorded and it is essential to control the effect at every single measurement. It thus happened that a previous report on sudden enhancement could not be verified and was retreated.9 Unfortunately, the shear-force topographies of broken tips with sharp edges sometimes give AFM images that look reasonable, and the risk of breaking stiff tips is very high if they are not very sharp. It is thus important to classify the types of artifacts that may occur if blunt, broken or abrased tips are used, even if tip breakage is most easily recognized by the loss (or lack) of enhanced reflectance in the shear-force gap.
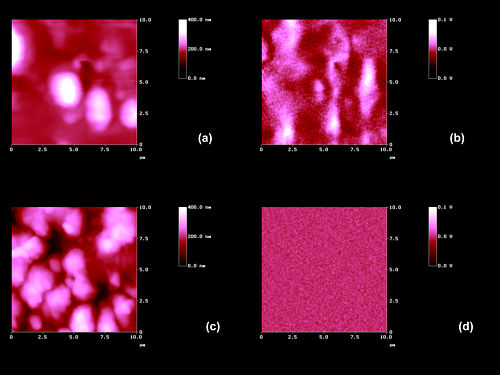
Correlation of optical and topographic images: Valid SNOM images must precisely correlate with simultaneous topography if that is caused by a chemical or physical state variation. This requirement is also the basis for chemical contrast and local spectroscopy. It was claimed that such correlation of "true optical contrast" to surface topography should not exist even for uncoated tips.5,32,33 However, images that do not exhibit such correlation are artificial unless some chemical or physical change was created locally on a rough surface without significant change of the topography.29,32,34 Of course, topography on chemically and physically uniform surfaces must not give an optical contrast if sharp uncoated tips with apex angles of <10° are used (steepness contrast occurs at slopes that approach or exceed 80°)28-30,35 and if local far-field light concentration is excluded.34 Thus, topography itself does not give rise to optical contrast in properly done reflection SNOM using the variations in the near-field enhanced reflected light (Fig. 1c,d is another example). Any alleged crosstalk by the Z-motion5 is experimentally excluded for these easily controlled conditions. If no precise correlation of chemistry and optical contrast occurs, the SNOM is in error due to easily recognized faulty conditions during its measurement, in particular by using blunt, abrased or broken tips that do not give the sudden enhancement.10 Numerous successful SNOM measurements with precise site or topography correlation of chemical contrast or fluorescence contrast have been published,2,3,10,22,26,28-30,34 whereas deviations from such close correlation or the appearance of optical contrast on chemically uniform surfaces33 show the recording of artifacts similar to the ones that are described for broken tips in the following subsections.
Topographic errors: It was claimed "from general principles" that "all SNOM configurations at constant distance mode" contain topographic artifacts, particularly with highly resolving sharp uncoated tips.36 While these considerations might be valuable for the steepness contrast at (near) vertical steps, they are irrelevant for well-done reflection-back-to-the-fiber SNOM at slopes below the slope angle of the tip. As already mentioned, topography itself (up to 1 or 2 µm heights; max. height is 368 nm in Figure 1c)2,3,28,35 does not give an optical contrast as long as the tip can follow the topography at constant distance. That is valid for both protrusions and pits on the same surface22 and amply documented.10,26,29-30,34 However, the favourable situation is lost if the sharp tip breaks or if blunt tips are used.

A VRML-Plugin is required to view these Images (e.g. Cosmo-Player) !
VRML Image of Fig 1a (low resolution- approx 54 kB)
VRML Image of Fig 1a (high resolution- approx 595 kB)
VRML Image of Fig 1b (low resolution - approx. 69 kB)
VRML Image of Fig 1b (high resolution - approx. 774 kB)
VRML Image of Fig 1c (low resolution- approx 70 kB
VRML Image of Fig 1c (high resolution- approx 819 kB)
VRML Image of Fig 1d (low resolution - approx. 76 kB)
VRML Image of Fig 1d (high resolution - approx. 1.047 kB)
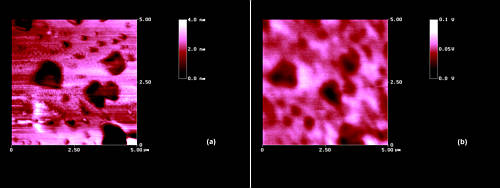
Figure 1a,b depicts the AFM and the optical image of a surface of p-nitroaniline on its (100) face after short application of NO2 gas to give the diazonium salt.37 The tip was blunt. The size of the topographic islands is typical for that chemical reaction although the islands appear smoothened when compared to more structured images that were obtained with a sharp tip in Figure 1c. Thus, we have some tip/sample convolution in Figure 1a. It is clearly seen that no correlation exists between topography and the optical image. Figure 1b is totally artificial and does not contain valid SNOM: a blunt tip was used that did not show the sudden enhancement of reflectance. In the correct SNOM image (Figure 1d) using a sharp tip that experienced the sudden enhancement, no optical contrast occurs, because the rough surface in Figure 1c is chemically uniform at all sites, giving no change in enhanced reflectance at constant distance throughout.
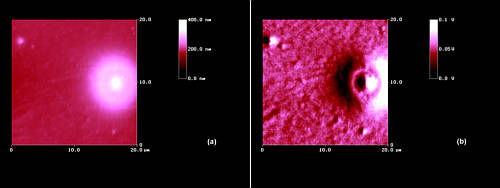
A spectacular artifact was found with a broken but apparently axial symmetric tip that gave rise to the artificial images by fluorescing 100-200 nm particles in polyvidone of Figure 2.
A VRML-Plugin is required to view these Images (e.g. Cosmo-Player) !
VRML Image of Fig 2a (low resolution- approx 52 kB)
VRML Image of Fig 2a (high resolution- approx 605 kB)
VRML Image of Fig 2b (low resolution - approx. 55 kB)
VRML Image of Fig 2b (high resolution - approx. 717 kB)
Even the five smaller "topographic features" are by far too large and they produce the same type of optical artifact as does the extremely extended topographic artifact (its maximum "height" is 160 nm). The optical image obtained under these faulty conditions resembles the negative first derivative of all "topographies" in Figure 2a and a similar image can be created by highpass filtering and inversion of the data from Figure 2a. Interestingly the optical response traced the inverted slope of the topographic artifact in this particular case. Unfortunately the microscopic inspection of the broken tip in question, which gave an enhancement factor of only 1.3 on that surface, was not precise enough for the modelling of that artifact. We note, however, some resemblance to features of the Figure 10 in Reference33 and presume that a related artifact had occurred there in a scan of pits, although there was no alignment along the scan direction.
It should be made clear, that the optical image in Figure 2 is not the result of a contrast enhancement differentiation. Quite different is the optical image in a PSTM (photon scanning tunneling microscopy) investigation of a 91 nm latex sphere in constant height mode.20 The reported feature was about 2 µm wide. It was presented as a differentiated image in order to enhance the interference fringes surrounding the sphere.20 While the image was interpreted in terms of a "field distribution that cannot be detected by any far-field technique" it should be stated that this huge topographic artifact has nothing in common with the one in Figure 2b that was taken in constant distance mode without interferences. Furthermore, PSTM in constant distance mode of a 1-µm-period SiN grating with a tip having a 50 nm apex was reported to result in a "mainly topographic image".20
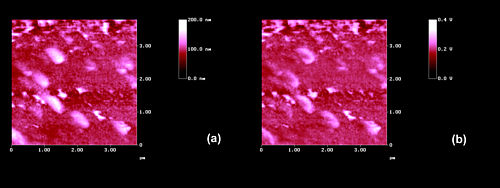
We must stress here that correct topography and submicroscopic local fluorescence contrast of the nanoparticles used in Figure 2 was obtained if a sharp tip (enhancement factor of 4.8) was used.22 An example is given in Figure 3 in which also the aggregation phenomena of the same particles in the same resin though at 46 times higher concentration were investigated with a sharp tip.
A VRML-Plugin is required to view these Images (e.g. Cosmo-Player) !
VRML Image of Fig 3a (low resolution- approx 65 kB)
VRML Image of Fig 3a (high resolution- approx 828 kB)
VRML Image of Fig 3b (low resolution - approx. 65 kB)
VRML Image of Fig 3b (high resolution - approx. 838 kB)
Figure 3a,b reveals single particles of correct size and aggregated ones, precise correspondence of topography and fluorescence SNOM and additional information regarding the modes of aggregation as well as the thickness of the resin cover (the topographic objects are found 10 nm larger than the fluorescence areas).22
Contrast Inversion: The sign of the chemical contrast is hard to predict as many different mechanisms are at work, including absorbance, fluorescence, Rayleigh, Raman, polarization, and largely unknown specific shear-force responses. Complete cancellation is possible though unlikely. Fluorescence and Raman emissions may be sorted out due to the change in wavelengths.
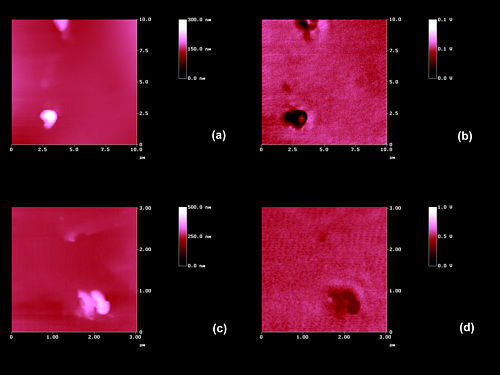
There are some reports of contrast reversal during SNOM measurements in the literature.9 It was proposed, that dust particles adsorbed to the tip and hung from it. With coated tips the interpretation of false contrast invoked shear-force phase effects.24 It is our experience that contrast inversion may occur upon tip breakage during scanning, the occurrence of that event being immediately detected by the drop of the power meter reading. Another report proved 15 nm optical resolution at a 2-5 nm height Al island step with 40% of the tips, whereas 60% of the tips provided inverse contrast "that cannot be near-field but must be far-field contrast".31 No reasons for the difference were given and no enhancement factors were reported. The reason seems to be quite obvious: the deficient measurements must be the result of blunt and/or broken tips that do not profit from the enhancement in the shear-force gap (e.g. five-fold) but collect far-field light at a much lower level of intensity. In Figure 4 we present a clearcut example with an asymmetrically broken tip that was unsuitable for SNOM because it gave only an enhancement factor of about 1.3 as it approached the surface of a polyvidone resin with the same fluorescent dye nanoparticles as in Figures 2 and 3 at high dilution.
A VRML-Plugin is required to view these Images (e.g. Cosmo-Player) !
VRML Image of Fig 4a (low resolution- approx 47 kB)
VRML Image of Fig 4a (high resolution- approx 668 kB)
VRML Image of Fig 4b (low resolution - approx. 33 kB)
VRML Image of Fig 4b (high resolution - approx. 343 kB)
VRML Image of Fig 4c (low resolution- approx 51 kB)
VRML Image of Fig 4c (high resolution- approx 587 kB)
VRML Image of Fig 4d (low resolution - approx. 66 kB)
VRML Image of Fig 4d (high resolution - approx. 841 kB)
At first glance a correlation between topographic and optical image seems to exist. However, a closer inspection reveals that the optical contrast is extended to the left, is split into two parts and is dark instead of bright as it should be from fluorescing particles. We present clear proof that only far-field fluorescence light was collected in this experiment at a rather low intensity but considerably less at the sites of tip imaging. The tip images that are caused by nanospheres of at least 100 and at most 200 nm diameter are 1.3 µm wide (135 nm high). No fluorescence light was coupled into the tip while it was imaged by the spheres in the absence of the sudden enhancement. Such conditions are totally different from the ones of artifact free measurements where the same fluorescent spheres were found bright at correct size (Figure 3).Thus, only parasitic fluorescent light was detected in the artificial Figure 4b. Figures 4c,d show correct negative chemical contrast as recorded with a good tip on islands of comparable size of a different sample which is neither split nor displaced, as required.
Displacement of optical and topographic contrast: The most important checks for the validity of a SNOM measurement in reflection-back-to-the-fiber mode are significant sudden enhancement (factor of >3) and precise site or topography correspondence of the optical contrast. If these conditions are not met one has artifacts in the optical and frequently also in the topographic image. A clearcut example of image displacement is shown in Figure 5, where a Pt/C test pattern (Kramer sample)38 was scanned that does not provide a useful shear-force mechanism but leads to wear of the tip. Abrasion of tips was detected by inspection with a light microscope after several scans.
A VRML-Plugin is required to view these Images (e.g. Cosmo-Player) !
VRML Image of Fig 5a (low resolution- approx 48 kB)
VRML Image of Fig 5a (high resolution- approx 471 kB)
VRML Image of Fig 5b (low resolution - approx. 47 kB)
VRML Image of Fig 5b (high resolution - approx. 487 kB)
It is useless to judge the edge resolution of our SNOM (valid lateral resolutions of 18 nm29,30 and 15 nm31 had been shown under nonabrasive conditions, see above) with artificial images that became worse with any further scan. The SNOM in Figure 5b is indeed artificial: first, the dark features that seem to reproduce the topography are significantly displaced from the topography and second, there are bright areas to the right of seven dark features in Figure 5b, although of a different character than in Figure 2b. A similar displacement of topographic and optical features (see also Figures 4a,b) is recognizable in a paper that imaged the surface of an ITO sample using a blunt uncoated tip with 100 nm diameter.39 A related problem occurred in the photon tunneling through a SiN pyramidal tip when a chromosome was scanned in force contact: the optical image was largely displaced and some interference fringes appeared.20 Clearly, the optical features in Figure 8 of that paper should be considered artificial.
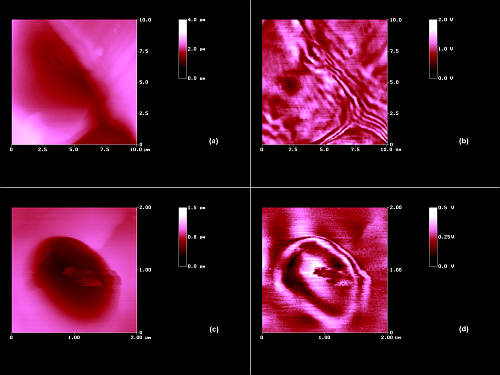
Artificial stripes' contrast: Interesting though artificial images are obtained with blunt or broken uncoated tips along extended slope areas even if these would not pose problems to sharp tips. Series of parallel stripes are obtained along the rims and slopes that, of course, do not tell any useful optical properties but are artificial. We present here sample images for the classification of the artifact that may be easily avoided by using sharp tips that collect the fluorescence precisely at the site of the fluorescer, and that have been successfully used for the determination of diffusion coefficients using the exponential decline of the intensity in the diffusion zone of fluorescent dyes, when collected in the shear-force gap.22 The primary 488 nm light was filtered off in these experiments by putting a bandpass filter in front of the detector. The fluorescent textile fibers (polyethyleneterephthalate) were embedded in a common resin (Technovit, Kulzer, Wehrheim, Germany) and cut with a microtome. The topographies in Figure 6a,c were obtained with blunt tips.
A VRML-Plugin is required to view these Images (e.g. Cosmo-Player) !
VRML Image of Fig 6a (low resolution- approx 63 kB)
VRML Image of Fig 6a (high resolution- approx 703 kB)
VRML Image of Fig 6b (low resolution - approx. 69 kB)
VRML Image of Fig 6b (high resolution - approx. 881 kB)
VRML Image of Fig 6c (low resolution- approx 58 kB)
VRML Image of Fig 6c (high resolution- approx 739 kB)
VRML Image of Fig 6d (low resolution - approx. 64 kB)
VRML Image of Fig 6d (high resolution - approx. 873 kB)
As might be expected, blunt tips in shear-force distance without sudden enhancement do not give valid fluorescence contrast. The five stripes in Figure 6b down right derive from a blunt tip exploring a uniform slope area with a tilt of 32° over a range of 1.5 µm in constant distance. In Figure 6d the ring stripe artifacts were created at slopes of 40-70°, the steeper areas being to the right in Figure 6c. Such slopes are not troublesome for sharp tips in enhanced fluorescence collection.22 However, the artificial optical reponse in Figure 6b,d is not a useful fluorescence contrast. The artifacts in Figure 6 are different from the ones discussed in Figures 1,2,4. They are also different from the "edge-contrast" that was described in Ref.11 The origins of these stripes are largely unknown. A more detailed analysis of the effects might be performed with the VRML primary data of Figures 6 and 7. However, that type of artifact can be easily avoided by using good tips. It appears that similar artifacts should be discussed in the Figures 6 and 7 of Reference33 that show some resemblance with the present Figure 6 and are likely to be the result of blunt and/or broken tips.
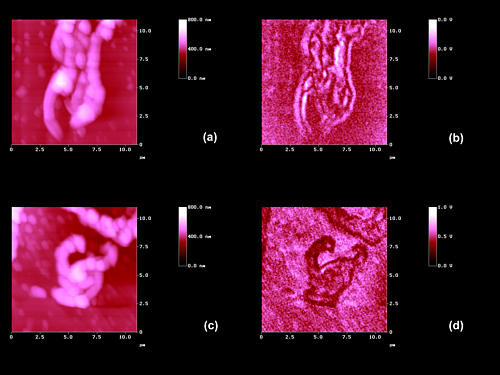
Stripes' artifacts are not restricted to concave topographies. They are also found with convex features, provided the tip is blunt or broken. Figures 7a,c show the topographies of islands that are grown on 2-mercaptobenzothiazole by slow autoxidation on the same crystal species. The blunt and the sharp tip give remarkably different artificial stripe type (b) and correct negative contrast (d) of the less polar bis-(2-benzothiazoline)-disulfide under sudden enhancement conditions.10,28.
A VRML-Plugin is required to view these Images (e.g. Cosmo-Player) !
VRML Image of Fig 7a (low resolution- approx 61 kB)
VRML Image of Fig 7a (high resolution- approx 713 kB)
VRML Image of Fig 7b (low resolution - approx. 55 kB)
VRML Image of Fig 7b (high resolution - approx. 761 kB)
VRML Image of Fig 7c (low resolution- approx 63 kB)
VRML Image of Fig 7c (high resolution- approx 713 kB)
VRML Image of Fig 7d (low resolution - approx. 67 kB)
VRML Image of Fig 7d (high resolution - approx. 889 kB)
The topography is easy, the slope angles ranging from 10 to 22°. However, blunt tips experience severe problems at these slopes. The poor performance of a 100 nm tip probing 282 nm latex spheres is recognizable in Ref.11 with a rather weak stripes' contrast.
It should be noted again, that a steepness contrast is unavoidable even for very sharp tips if the slope angles are larger than the slope angle of the tip.
CONCLUSIONS
From the various SNOM techniques the reflection-back-to-the fiber constant distance mode with crossed polarization detection (sensitivity improvement) is suitable for rough surfaces of industrial importance. It has to be kept in mind, that this technique uses uncoated tips and requires the occurrence of the sudden increase of reflectance as the tip goes to shear-force distance (3-8 fold increase or more). Artifact free high resolution SNOM uses variations in the intensity of that near-field light. The weak background is not distance modulated on that level and does not interfere. However, such enhancement is only available for very sharp tips (e.g. radius of 15 nm) that, fortunately, have a lower tendency for breakage than blunt ones (radius of >50 nm). Blunt and broken tips do not show the effect and thus provide artifacts exclusively. We collected various types of artifacts that occur also with other SNOM techniques though usually for different reasons, in order to facilitate the localization of faulty claims in the literature and to support further the use of the particularly straightforward technique with highly resolving cold uncoated tips. For controlled SNOM there must be a power meter in front of the operator or else a recorder for the documentation of the large increase in intensity at shear-force distance. A wealth of clearcut technical use of SNOM22 is already available.
Acknowledgements
This work was supported by the BASF AG, Ludwigshafen and the Fonds der Chemischen Industrie. We thank Dr. G. Wagenblast, Ludwigshafen, for the samples for Figures 2, 3, 4a,b and 6, Dr. U. Fischer, Münster, for the sample for and Dipl. Chem. J. Boy, Oldenburg, for the measurement of Figure 8 (EPOC). Dr. M. J. Schöning, Jülich, is thanked for the sample for Figure 9 (EPOC) and Dr. A. Kramer, Garching, for the sample for Figure 5.
REFERENCES
1. G. Kaupp, J. Schmeyers, U. Pogodda, M. Haak, T. Marquardt and M. Plagmann. Thin Solid Films 264, 205-211 (1995).
2. G. Kaupp. in Comprehensive Supramolecular Chemistry, Vol. 8, edited by J. E. D. Davies, pp. 381-423 + 21 color plates. Elsevier, Oxford (1996).
3. G. Kaupp. Chemie in unserer Zeit 31, 129-139 (1997). Engl. translation in http://kaupp.chemie.uni-oldenburg.de.
4. S. N. Magonov and M.-H. Whangbo. Surface Analysis with STM and AFM. VCH, Weinheim (1996); unfortunately on p. 36 an asymmetric cantilever tip is imaged without recognition of its surface scraping properties (see. Ref.1,15).
5. B. Hecht, H. Bielefeldt, Y. Inouye, L. Novotny and D. W. Pohl. J. Appl. Phys. 81, 2492-2498 (1997).
6. H. K. Danzebrink, A. Castiaux, C. Girard, X. Bouju and G. Wilkening. Ultramicroscopy 71, 371-377 (1998).
7. A. H. La Rosa, B. I. Yakobson and H. D. Hallen. Appl. Phys. Lett. 67, 2597-2599 (1995).
8. D. Courjon, J.-M. Vigoureux, M. Spajer, K. Sarayeddine and S. Leblanc. Appl. Opt. 29, 3734 (1990).
9. V. Sandoghdar, S. Wegscheider, G. Krausch and J. Mlynek. J. Appl. Phys. 81, 2499-2503 (1997). The authors used tips with radii of 50-100 nm that break very readily upon scanning; see text.
10. G. Kaupp and A. Herrmann. J. Phys. Org. Chem. 12, 141-143 (1999).
11. C. Adelmann, J. Hetzler, G. Scheiber, T. Schimmel, M. Wegener, H.B. Weber and H. v. Löhneysen, Appl. Phys. Lett. 74, 179-181 (1999).
12. D. J. Keller and F. S. Franke. Surface Science 294, 409-419 (1993). U. D. Schwarz, H. Haefke, P. Reimann and H.-J. Güntherodt. J. Microscopy 173, 183-197 (1993).
13. J. D. Kiely and D. A. Bonnell. J. Vac. Sci. Technol. B 15, 1483-1493 (1997).
14. A. Herrmann, Dissertation, Universität Oldenburg, 1999.
15. G. Kaupp and M. Plagmann. J. Photochem. Photobiol. A 80, 399-407 (1994).
16. D. Zeisel, S. Nettesheim, B. Dutoit and R. Zenobi. Appl. Phys. Lett. 68, 2491-2492 (1996).
17. S. Madsen, N. C. R. Holme, P. S. Ramanujam, S. Hvilsted, J. M. Hvam and S. J. Smith. Ultramicroscopy 71, 65-71 (1998).
18. E. Betzig, J. K. Trautmann, T. D. Harris, J. S. Weiner and R. L. Kostelal. Science 251, 1468 (1991).
19. M. Haimmady, E. Farnault, T. Yahiro and H. Kawakatsu. J. Vac. Sci. Technol. B 15, 1539-1542 (1997).
20. N. F. van Hulst, M. H. P. Moers and B. Bölger. J. Microscopy 171, 95-105 (1993).
21. S. Webster, D. N. Batchelder and D. A. Smith. Appl. Phys. Lett. 72, 1478 (1998).
22. G. Kaupp, A. Herrmann and G. Wagenblast. Proc. SPIE-Int. Soc. Opt. Eng. 3607, 16-25 (1999).
23. M. Rücker, P. Vanoppen, F. C. De Schryver, J. J. Ter Horst, J. Hotta and H. Masuhara. Macromolecules 28, 7530-7535 (1995).
24. R. L. Williamson, L. J. Brereton, M. Antognozzi and M. J. Miles. Ultramicroscopy 71, 165-175 (1998).
25. A. Kramer, T. Hartmann, R. Eschrich and R. Guckenberger. Ultramicroscopy 71, 123-132 (1998).
26. G. Kaupp and A. Herrmann. Ultramicroscopy 71, 383-388 (1998).
27. M. Abraham, W. Ehrfeld, M. Lacher, K. Mayr, W. Noell, P. Güthner and J. Barenz. Ultramicroscopy 71, 93-98 (1998).
28. G. Kaupp, A. Herrmann and M. Haak. Internet Photochem. Photobiol. (1998); http://www.photobiology.com/IUPAC98/page2.htm.
29. G. Kaupp and A. Herrmann. J. Phys. Org. Chem. 10, 675-679 (1997).
30. G. Kaupp, M. Haak and A. Herrmann. Lecture at the 4th Near-Field Optics, Conf., Jerusalem (1997); Book of Abstracts, p. 92 (1997). The positively refereed full paper of these authors for Ultramicroscopy got lost in the E-mail dispatch to the Editor.
31. S. Madsen, S. I. Bozhevolnyi and J. M. Hvam. Opt. Commun. 146, 277-284 (1998).
32. S. I. Bozhevolnyi and B. Vohnsen. J. Opt. Soc. Am. B 14, 1656-1663 (1997). Unfortunately the authors used etched fibers that are not sharp enough and break very readily;22 near-field enhancement of reflectance was not reported.
33. S. I. Bozhevolnyi, I. O. Smolyaninov and O. Keller. Appl. Opt. 34, 3793-3799 (1995). Etched fibers were used in that report.
34. G. Kaupp, A. Herrmann and M. Haak. J. Vac. Sci. Technol. B. 15, 1521-1526 (1997).
35. G. Kaupp and M. Haak. Mol. Cryst. Liq. Cryst. 313, 193-198 (1998).
36. S. I. Bozhevolnyi. J. Opt. Am. B 14, 2254-2259 (1997).
37. G. Kaupp and A. Herrmann. J. prakt. Chem./Chem.-Ztg. 339, 256-260 (1997). G. Kaupp, J. Schmeyers, M. Haak, T. Marquardt and A. Herrmann. Mol. Cryst. Liq. Cryst. 276, 315-337 (1996).
38. T. Hartmann, G. Gatz, W. Wiegräbe, A. Kramer, A. Hillebrand, K. Lieberman, W. Baumeister and R. Guckenberger. in Near-Field Optics, edited by D. W. Pohl and D. Courjon, p. 33. Kluwer, Netherlands (1993).
39. A. Jalocha and N. F. van Hulst. Optics Commun. 119, 17-22 (1995).
40. G. Kaupp, J. Schmeyers, F. Toda, H. Takumi and H. Koshima, J. Phys. Org. Chem. 9, 795-800 (1996).
41. G. Kaupp, J. Schmeyers, M. Haak and A. Herrmann. Labo-Trend 95, 57-63 (1995). English translation in http://kaupp.chemie.uni-oldenburg.de.
APPENDIX:
Some typical AFM artifacts and their recognition from the 3D data.
In most cases AFM and STM data are published as 2D projections and thus cannot be judged in terms of possible artifacts or used for efficient data mining. Perspective images are somewhat more revealing, but still cannot be checked further. Only full disclosure of the 3D x/y/z data can be used for judgements, whether 2D images are partly or fully artificial.
Verticals and overhangs, unavoidable AFM artefacts: It may be useful to disclose here some 3D AFM data of a mica surface that is covered with a monolayer of hexagonal closest packed latex spheres, a typical example for unavoidable AFM artifacts.
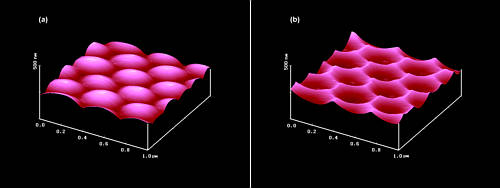
Figure 8 shows a 1 µm wide contact AFM scan with a common Si3N4 tip (apex angle 45°C) in a 1:1:1 (x/y/z) perspective representation. The hexagonal arrangement of the hills is clearly seen, however, these have not the shape of spheres but appear flattened (not seen in the 2D projections of top-view images).
A VRML-Plugin is required to view these Images (e.g. Cosmo-Player) !
VRML Image of Fig 8a (low resolution- approx 63 kB)
VRML Image of Fig 8a (high resolution- approx 690 kB)
VRML Image of Fig 8b (low resolution - approx. 63 kB)
VRML Image of Fig 8b (high resolution - approx. 693 kB)
Clearly, the measurement is artificial at the steeper parts of the spheres and the medium depth at the triangles between three 220 nm spheres is only 83 nm, and the medium depth between two spheres is only 61 nm in Figure 8a. The tip cannot reach the ground between the spheres. The inverted image (upside down) exhibits sharp rims (actually trenches) and peaks (actually depths) that are images of the tip. Such artifacts on spheres can be decreased, but never avoided with sharper tips or with non-contact AFM.
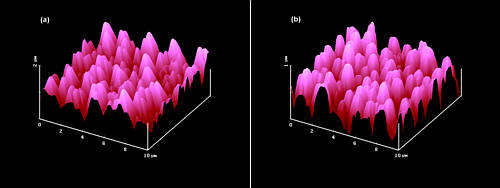
Steep slopes; improvements with sharper tips: If slopes reach or exceed the apex angle of the tip, one gets images of the tip. For example, if the surface of extremely rough porous silica on silicon is scanned with a common Si3N4 tip, the features obtained are pyramids with smooth apex which indicate that the slopes are steeper than 45°. This is interactively analyzable with the data for Figure 9a. Also shown (Figure 9b) is the improvement with sharp non-contact tips: Much more of the topography can be seen.
A VRML-Plugin is required to view these Images (e.g. Cosmo-Player) !
VRML Image of Fig 9a (low resolution- approx 71 kB)
VRML Image of Fig 9a (high resolution- approx 853 kB)
VRML Image of Fig 9b (low resolution - approx. 71 kB)
VRML Image of Fig 9b (high resolution - approx. 875 kB)
The upper parts of the features in Figure 9b give a good impression of the roughness. The tip descended down to more than 1 µm depth. However, the slopes approach the slope angle of the tip and there may be verticals or caves, which cannot show up. Anyhow, the image is artificial down in the deep valleys, as can also be analyzed by inversion of the image (upside down) in 3D-representations.2,40
Asymmetries due to improper conditions of measurement: The symmetry of topographic objects may be distorted for various reasons. For example the mounds of figure 8a have an elliptical shape (compression or artifact?) and the pyramids in Figure 9a are skew, while the features of Figure 9b look similar when viewed from every side. The quality of the measurement of all AFM topographies should be interactively judged by turning the perspective images by 90° (also 180 and 270°).1,41 If presumedly symmetric features are consistently found with largely different slopes on various sides (these are measured at several cross-sections), the scanning angle was probably not optimized or the sample was too inclined in the measurement, both factors giving rise to distorted topographies.
It appears clear, that any simultaneous optical contrast from image parts that are artificial in the AFM cannot be correct SNOM. Fortunately many technical surfaces do not exhibit extremely steep slopes and thus provide artifact-free AFM topographies, but unfortunately, quality and reliability tests of that type and further analyses are not possible with hitherto published pixel graphics or printed images, lacking full data.